Creating a bug reporting tool
Managing bugs and getting bug reports for a game is really important in order to improve the player’s quality of gameplay. To manage the bugs I wanted to use Github’s nice issue tracker, and I wanted testers to be able to submit bugs directly from within the game. Instead of doing this just for me, I implemented a package. Let’s see how I did all of this.
After a little bit of digging I couldn’t find something which was meeting my needs, so I decided to implement my own bug reporter. In any case I learned a lot of new things so even if I end up finding something better the time is not entirely lost 😆. Let’s dig in!
The final thing
Before I bore you with technicalities, let me show you what I wanted to achieve. Let’s say you encounter one of those nasty bugs in a game, annoying right? Well, now there is a way to submit an issue directly to Github to let me know I should be working on the bug.
F12!
So yeah, press F12, and the game automatically pauses, takes a screenshot of your current situation and opens a GUI which lets you enter some informations:
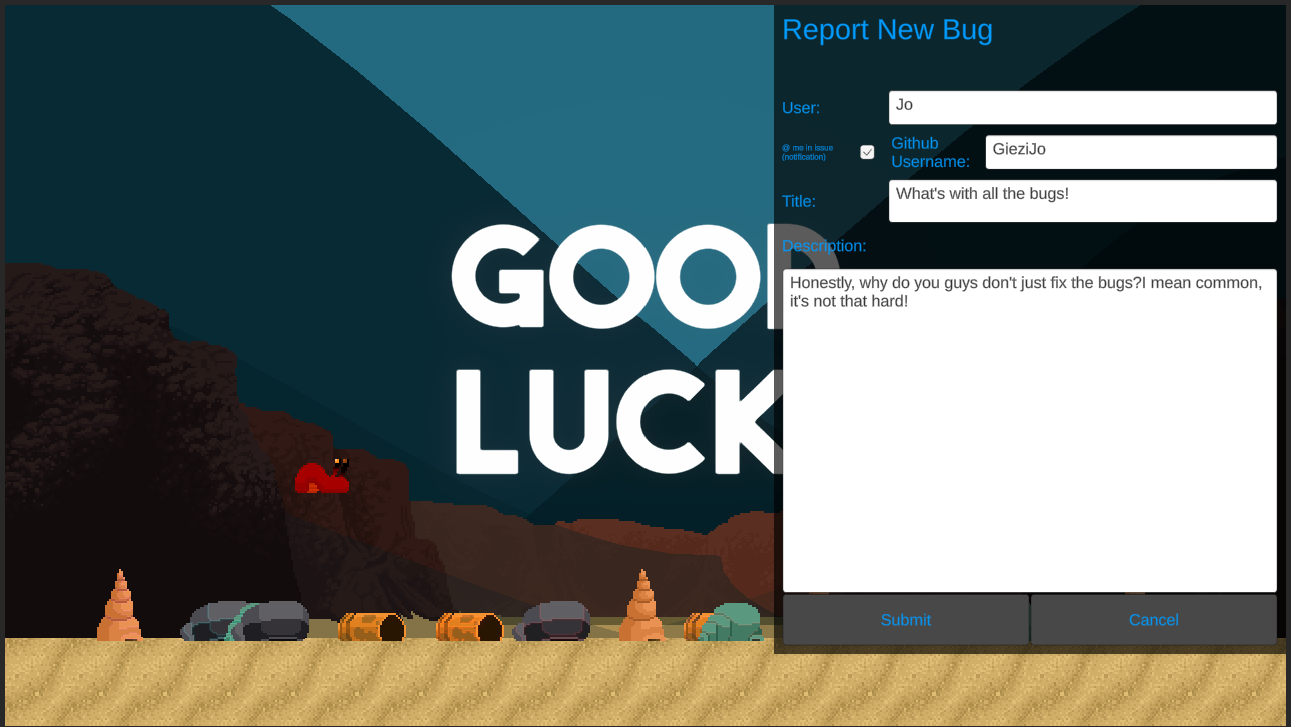
- User: the name you want to be displayed as person having submitted the bug.
- Github issue mention toggle: if enabled, you get a “@” mention in the issue and get a notification in Github.
- Title: the title of your issue.
- Description: describe the issue to the best of your ability.
- Submitting and canceling buttons.
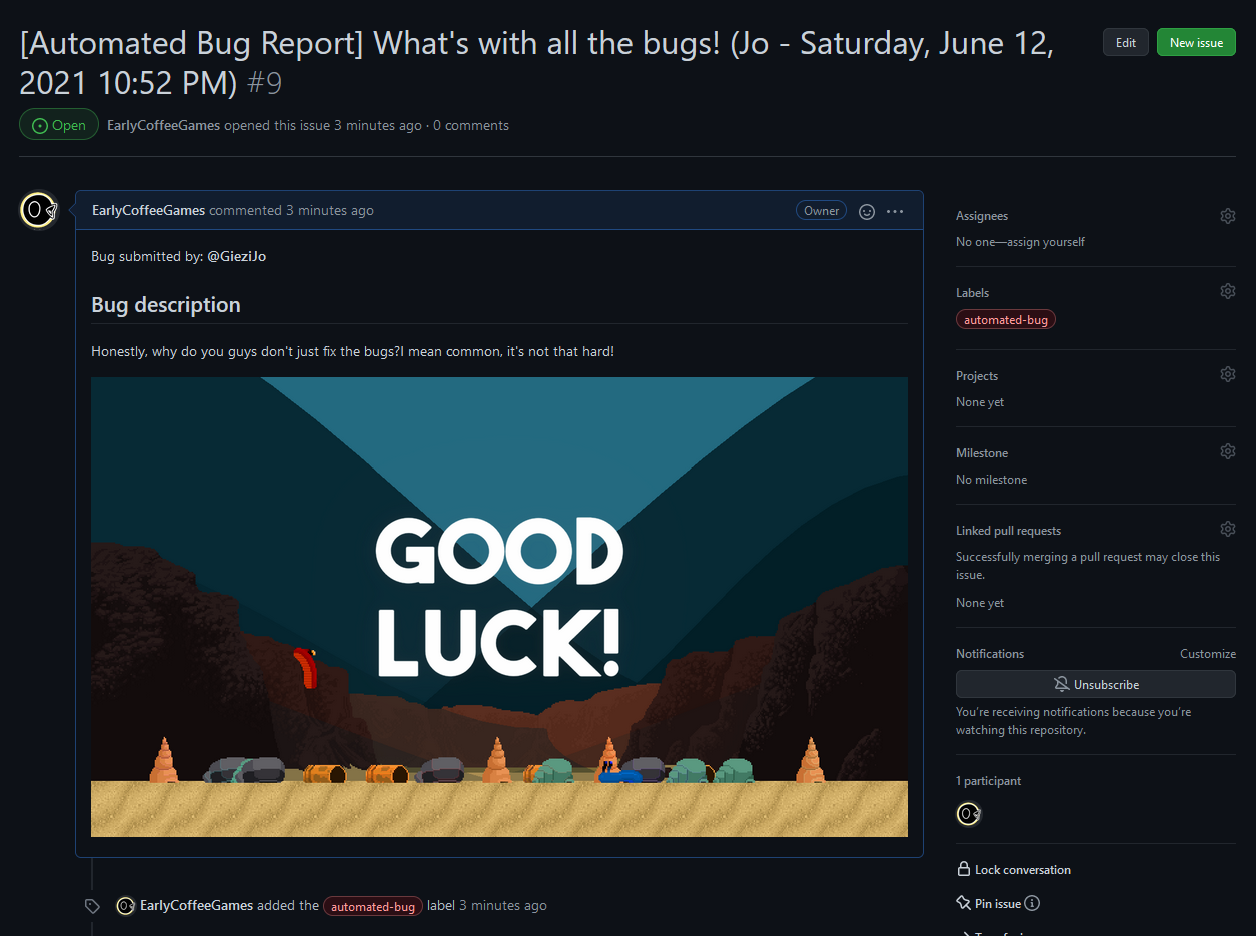
Once you hit submit, a new issue is opened on Github with the informations you’ve provided, as well as a screenshot with the current state of the game:
I haven’t yet attached Log Files, but that might come in the future.
So, jüp, if you’re interested in using this, or contributing, feel free to head over to https://github.com/GieziJo/GithubIssueBugReporter. Obviously I don’t know how solid the implementation is, and I’m very open to feedbacks and contributions.
Challenges and implementation
The rest of the article will be about how I implemented this little tool and the issues I faced, will be a bit technical, but hope you will enjoy it 😊.
Send issues and data to Github
The first challenge I have been facing is to send data and issues to Github from c#. I’ve found a really nice little library called Octokit.net which handles most of the communication with Github, so that’s a relief!
Side Note
By the way, it’s actually really easy to use .dll files inside unity, at least if you use Assembly definition files (maybe also if you don’t, I haven’t tried): just drop the .dll in your project, in the assembly folder where you want to use it. For nuget packages, you can download the .nupkg, change the extension to .zip and extract the contained .dll. I don’t know if you can directly use nuget’s package manager inside Unity, but I haven’t found how yet.
Side Note End
I’ve created a little static function which takes the title and text (body) of the issue as arguments, and sends them to github in the form of a new issue:
public static void ReportBug(string title, string body)
{
    var client = new GitHubClient(
        new ProductHeaderValue(GithubInfos.ProductHeader));

    var auth = new Credentials(AccessToken.BUG_REPO_TOKEN);
    client.Credentials = auth;
    SubmitIssueAndWait(client, title, body);
}

private static async void SubmitIssueAndWait(GitHubClient client,
string title, string body)
{
    var issueInfos = new NewIssue(title)
    {
        Body = body,
        Labels = {GithubInfos.CustomLabel}
    };
    var issue = await client.Issue.Create
    (
        GithubInfos.GithubUsername,
        GithubInfos.IssuesRepo,
        issueInfos
    );
}
So what’s going on here? With Octokit you first need to create a new GitHubClient, to which you need to feed a product header. The product header can be anything, mine is EarlyCoffee.Games.Hermit, pretty basic.
You then need to give your authotentification informations to access the repo to which you want to push the issue. I’ve found that the easiest way to go is to generate a token with access rights to your repo.
You then launch an async function (SubmitIssueAndWait) which submits the issue to github. Note that in client.Issue.Create you need to specify the repo owners Github Username (or any user with collaborator level access), and the repo you want to send the issue to.
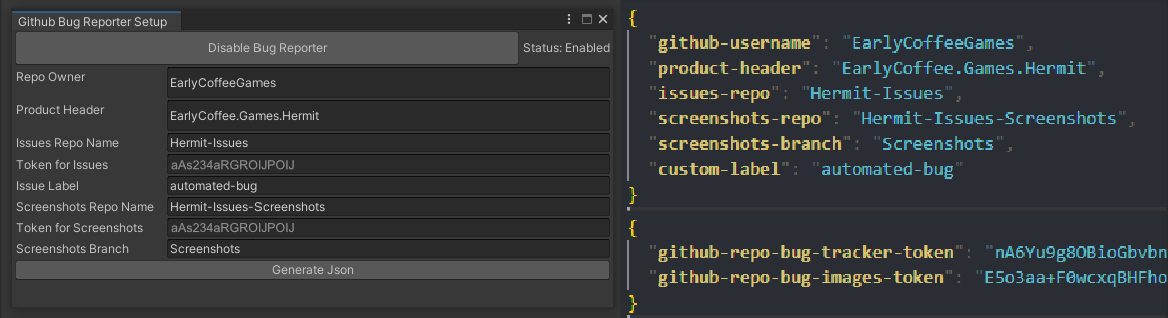
Note that all these connection informations are called through two classes which I created called GithubInfos and AccessToken which will read Json files containing the connection information.
To manage these, I created a little GUI where you can enter the data and generate the required Json files (and encrypt the tokens):
So yeah, creating a new issue on Github ended up being not too difficult once I discovered Octokit and understood the token thing. But I guess everything is quite easy once you understand what you’re doing 😅.
Sending an image ended up being a bit more tricky. Basically there is no way to associate an image to the issue directly, but you can link one in the body of the description like so:

The issue is storing the image somewhere so that it can be displayed. After digging a bit, I found out that the best way to do this is to commit and push a new image to an existing Github repo and directly link to that image once it is uploaded.
When you upload an image to Github it can be accessed at the following path (obviously without the brackets 😄):
https://raw.githubusercontent.com/[Username]/[RepoName]/[Branch]/path/to/
    my/screenshot.png
And just like that an image can be linked inside my issue.
To upload the image I wrote the following code, again with the use of Octokit:
public static void UploadImageToGithub(byte[] byteArray)
{
    var client = new GitHubClient(
        new ProductHeaderValue(GithubInfos.ProductHeader));
    var basicAuth = new Credentials(AccessToken.IMAGE_REPO_TOKEN);
    client.Credentials = basicAuth;


    string image = Convert.ToBase64String(byteArray);

    CreateFileRequest newFile = new CreateFileRequest
    (
        DateTime.UtcNow.AddHours(1).ToString("yyyy_MM_dd_HH_mm_ss") +
            "_" + Random.Range(0,100000),
        image,
        GithubInfos.ScreenshotsBranch, false
    );

    CommitAndWaitForAnswer(client, newFile);
}

private static async void CommitAndWaitForAnswer(GitHubClient client,
CreateFileRequest newFile)
{
    var response = await client.Repository.Content.CreateFile
    (
        GithubInfos.GithubUsername,
        GithubInfos.ScreenshotsRepo,
        $"Screenshots/{newFile.Message}.png",
        newFile
    );
}
The code works in a similar way than the snippet before, create a client, credentials, etc.
The function takes as argument an array of bytes representing the screenshot (I will go over how to get this array below), and then transforms it into a base 64 string so that it can be sent to Github as a string file.
By setting the last argument of CreateFileRequest to false, Github automatically interprets the string as an image.
The arguments before that are simply there to give the image a unique name and then the actual image data, as well as the branch to which you want to commit (which is again handled through my GithubInfos class).
In the CommitAndWaitForAnswer function, the data is then committed to the repo. The important point here is the previous to last argument of CreateFile, which specifies the path (with extension) where the image will be stored in the repo. This is the path we will be using in the link above to display the image in the issue.
Store access tokens
DISCLAIMER: I’m an absolute noob in terms of web security so take everything I’ve written here with a grain of salt and let me know if things could be done in a better way!
So one of the biggest issues I had, was to devise a smart way to store the access tokens (and honestly I’m not sure if this is the way to go, very open to ideas!).
As mentioned before I have this little tool which allows me to generate the Json files with the different connection informations.
Once you click the Generate Json button, my tool creates a new file under Assets/Resources/GieziTools.GithubIssueBugReporter/GithubAccessTokens.json and along with it a .gitignore file containing the following two lines:
GithubAccessTokens.json
GithubAccessTokens.json.meta
This way the access tokens in the Json file won’t be committed to Github. Remove the .gitignore file if you think this should be the case.
I’m not sure how readable these Json files are once they are compiled. To be on the safe side the tokens are encrypted with a simple cypher code I found on Stackoverflow.
The encryption key should be defined by the user, but I don’t know where to save it in the Unity project safely to access it in the code afterwards to decrypt the key when I need it, so for now it’s just in the code.
Open to any suggestions on how to improve this 😁.
Reading the Json files
Once the Json file exists, loading the data and using it is pretty easy:
public static class AccessToken
{
    public static string BUG_REPO_TOKEN => bug_repo_token;
    public static string IMAGE_REPO_TOKEN => image_repo_token;

    private static string bug_repo_token;
    private static string image_repo_token;

    static AccessToken() => Initialize();

    private static void Initialize()
    {
        if (!(bug_repo_token == null || image_repo_token == null))
            return;

        Dictionary<string, string> tokens =
        JsonConvert.DeserializeObject<Dictionary<string, string>>
        (
            Resources.Load<TextAsset>("GieziTools.GithubIssueBugReporter/
            GithubAccessTokens"
        ).ToString());

        bug_repo_token =
            StringCipher.Decrypt(tokens["github-repo-bug-tracker-token"]);
        image_repo_token =
            StringCipher.Decrypt(tokens["github-repo-bug-images-token"]);
    }
}
The Json file is deserialised to a dictionary of <string, string> using the Json.Net library, which can be easily added to Unity by adding "com.unity.nuget.newtonsoft-json": "2.0.0" to the manifest.json file for a project or package.json for a package, under dependencies.
The same procedure (without the cipher part) is implemented for the GithubInfos class.
Take a screenshot in Unity
The next tricky part was to take a screenshot of the game in Unity, without saving it to a file, but keeping it in the memory so that we can upload it to github (remember the bytes array before?).
I first stumbled on a cool video by Code Monkey, but this ended up not working for URP, but gave me some important understanding in how it works. After quite a bit of testing and digging, I ended up stumbling upon ScreenCapture.CaptureScreenshotAsTexture, which made it really easy.
I then came up with this really simple coroutine:
IEnumerator WaitForScreenshot()
{
    yield return new WaitForEndOfFrame();

    Texture2D texture = ScreenCapture.CaptureScreenshotAsTexture();

    Rect rect = new Rect(0, 0, texture.width, texture.height);
    texture.ReadPixels(rect,0,0);
    byte[] bytearray = texture.EncodeToPNG();

    DestroyImmediate(texture);
}
To my understanding, you capture the screen to a 2D texture with the ScreenCapture class, then create a rect of the size of the screen, and finally write the information with the correct screen size. The “encode to PNG”-step allows to get the info as an array of bytes, which is what we wanted above!
Instantiate UI prefab automatically
I wanted for this tool, if enabled (see below), to launch automatically without the user having to remember to add a prefab to the first scene or something annoying, so I dug around, and I think I found a way to make this work.
I found the attribute RuntimeInitializeOnLoadMethod which allows to call a static function on scene loading, so a class which does not need to be in the scene.
From there I can check if an instance of the BuReportHandler, my class handling the bug report exists, and if not, I instantiate the prefab with the unity GUI:
public class InstantiatePrefab
{
  [RuntimeInitializeOnLoadMethod(RuntimeInitializeLoadType.AfterSceneLoad)]
  static void InitialisePrefab()
  {
    if (BugReportHandler.Instance == null)
    {
      GameObject bugReportAsset = Resources.Load<GameObject>("BugReporter");
      Object.Instantiate(bugReportAsset);
    }
  }
}
The BugReporter asset is located in the Resources folder in my package, which makes it available on runtime.
Seems to work!
Enable/Disable bug reporter
To enable and disable the whole bug reporter package, meaning it should not actually compile with the rest of the project if disabled, I am using define Define Constrains in the assembly definition file. If the define GIEZI_TOOLS_ENABLE_BUG_REPORTER exists, it will compile, otherwise it won’t.
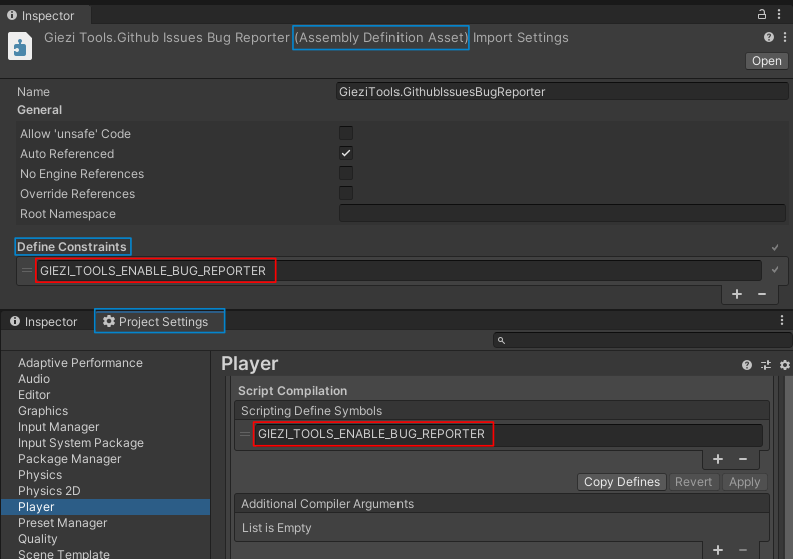
The defines can be found under Project Settings > Player > Scripting Define Symbols. To modify these through code I wrote this little routine:
private void UpdateDefines()
{
    string scriptingDefineSymbolsForGroup =
        PlayerSettings.GetScriptingDefineSymbolsForGroup(
            BuildTargetGroup.Standalone);

    List<string> definesList =
        scriptingDefineSymbolsForGroup.Split(';').ToList();

    if (state && !definesList.Contains(BUG_REPORTER_DEFINE))
    {
        definesList.Add(BUG_REPORTER_DEFINE);
        string newDefines = string.Join(";",definesList);
        PlayerSettings.SetScriptingDefineSymbolsForGroup(
            BuildTargetGroup.Standalone, newDefines);

    }
    else if (!state && definesList.Contains(BUG_REPORTER_DEFINE))
    {
        definesList.Remove(BUG_REPORTER_DEFINE);
        string newDefines = string.Join(";",definesList);
        PlayerSettings.SetScriptingDefineSymbolsForGroup(
            BuildTargetGroup.Standalone,
            newDefines);
    }
}
Where state is the state of the package (enabled or disabled).
The defines are separated by ;, by splitting them and transforming them into a list, one can check if the required define is contained and add it, - or remove it -, depending on the package state. string.Join then allows to merge everything together again.
As you can see, this only targets the target group Standalone. Given that you need a mouse and keyboard to fill out the form that probably makes sense.
The assembly file could also be tailored to only compile when the target is PC for instance.
Get involved
So yeah, as you can see this is a lot of moving pieces. I learned a lot doing this, but I’m sure there are better ways to solve some of the things I’ve implemented.
This is all open source, so if you want to help improve on this, you are very welcome to do so!
The repo is here: https://github.com/GieziJo/GithubIssueBugReporter.
Conclusion
Yeah so this one was very technical, okay 😅 But I feel like I dug a bit further than normal Unity stuff there, so felt like sharing my process. Let me know if you liked it!
Promised next one will be more game related (probably).
Cheers, and thanks for reading!
Read the latest articles:
Updating the bug reporting tool
Early Coffee Games at GDC 2022 in San Francisco!
Scroll Rect - automatic scroll with elements navigation
