Scroll Rect - automatic scroll with elements navigation
I’ve been struggling with scroll rects in Unity for quite some time now, and thought I would give it some time and try to understand how they work. I need them to do two things: dynamically adapt to growing content, and scroll with navigation inputs, i.e. arrows or joystick, when going over content in the scroll rect. Here is a breakdown of how I made it work.
Let’s first have a look at the final scroll view:

These are all save slots for Hermit. The player can brows the different slots, and, if desired, create a new save. As you can see the scroll rect nicely scrolls such that the selected item remains inside the visible part.
I made a minimal working example Unity project you can download if you want to follow along or simply get the assets.
Let’s quickly talk about the hierarchy of the scroll rect.
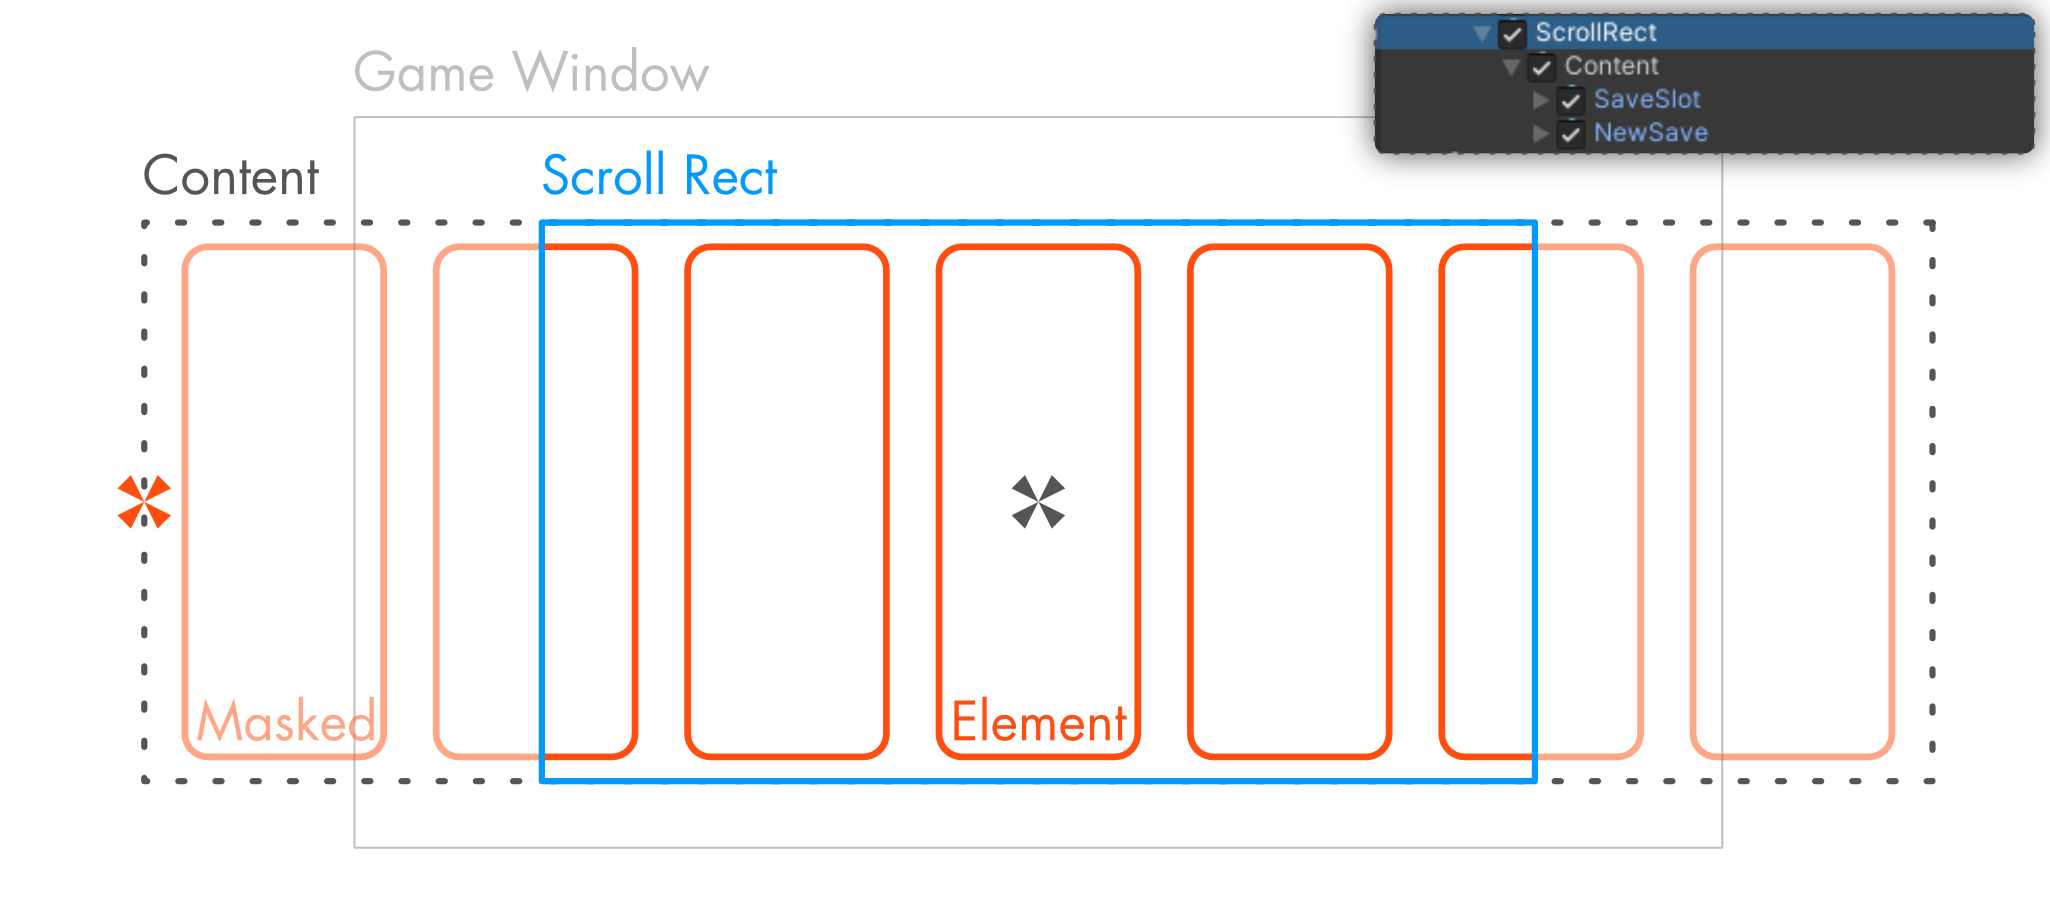
The Scroll Rect is the part containing the ScrollRect component and is the visible part of the scroll window. It usually contains a Mask component, meaning the Content part is only visible inside the Scroll Rect.
(Side note: if you create a `Scroll View` from Unity, you will see a slightly more complex hierarchy, with the `Content` part inside a `Viewport`. This is because Unity also adds Scrollbars. The `Mask` is then on the `Viewport`.)
The content element is the one containing all the elements, in my case the save slots. The content element’s width dictates how the scrolling occures. As mentioned above, the first issue I faced was having the content element’s dynamically adapt to an increasing number of save slots, so let’s start with this.
Dynamic scroll rect width
As I discovered in this blog post, this is actually pretty easy.
On your content panel you need two things: a Horizontal Layout Group and a Content Size Fitter.
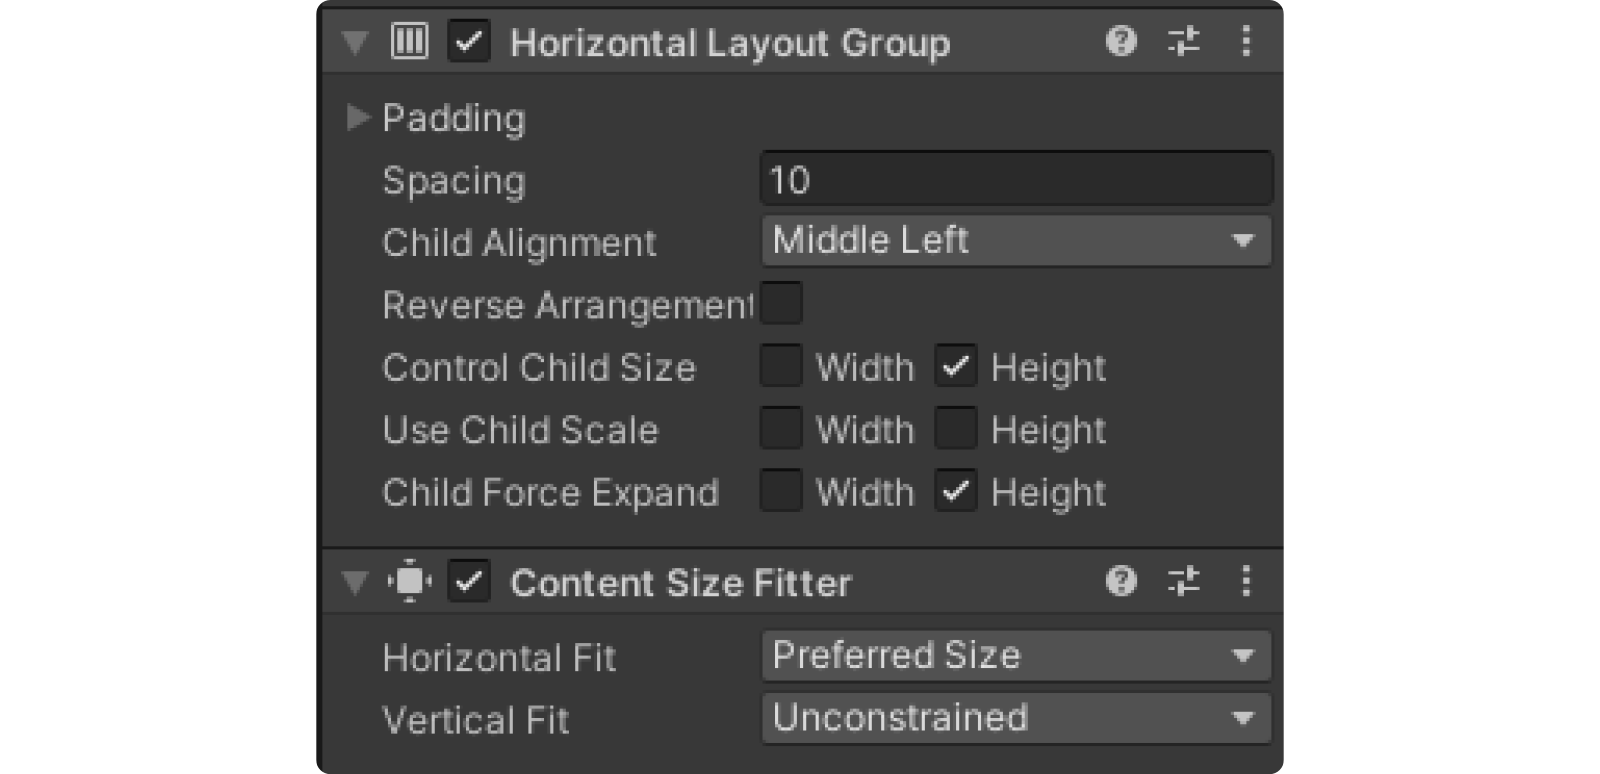
The Horizontal Layout Group will ensure the items in you content panel are correctly distributed next to each other. The Content Size Fitter then modifies the content to be as wide as need be to cover all elements. Simply set the Horizontal Fit to Preferred Size.
You may notice here that the Horizontal Layout Group‘s Child Alignment is set to Middle Left. This is shown with the red cross is the hierarchy image (the black cross indicates where the content itself is anchored in the Scroll Rect). This will be important later.
Scrolling with element selection
First, we need to know when an element is selected, so that we can scroll the content accordingly.
On Element Selected
The way I decided to achieve this is to add a Event Trigger component to each element (I tried to do this from code but didn’t work, so just add that element to the prefab), and then add a callback to the Event Trigger:
foreach (EventTrigger eventTrigger in EventTriggerList)
    eventTrigger.AddListener(EventTriggerType.Select, OnSelect);

private void OnSelect(BaseEventData baseEventData)
{
    RectTransform selectedRectTransform = baseEventData.selectedObject.GetComponent<RectTransform>();
    //...
}
Where EventTriggerList is the list of Event Trigger components.
The function AddListener is an extension of the EventTrigger class which allows to add action callbacks (found here).
Moving the content window
Now that we get a feedback when an element is selected, we simply need to move the content window accordingly.
To better understand what we are doing, here is a little schema with the different measures we will be working with:

There are two ways to move the content panel: set a new value for rectTransform.anchoredPosition.x (where rectTransform is the component on content), or use scrollRect.horizontalNormalizedPosition. The latter can be set to a value between 0 and 1, and itself modifies the anchored position in the background.
Setting horizontalNormalizedPosition to 0 means the content is scrolled all the way to the left, i.e. showing the first element:
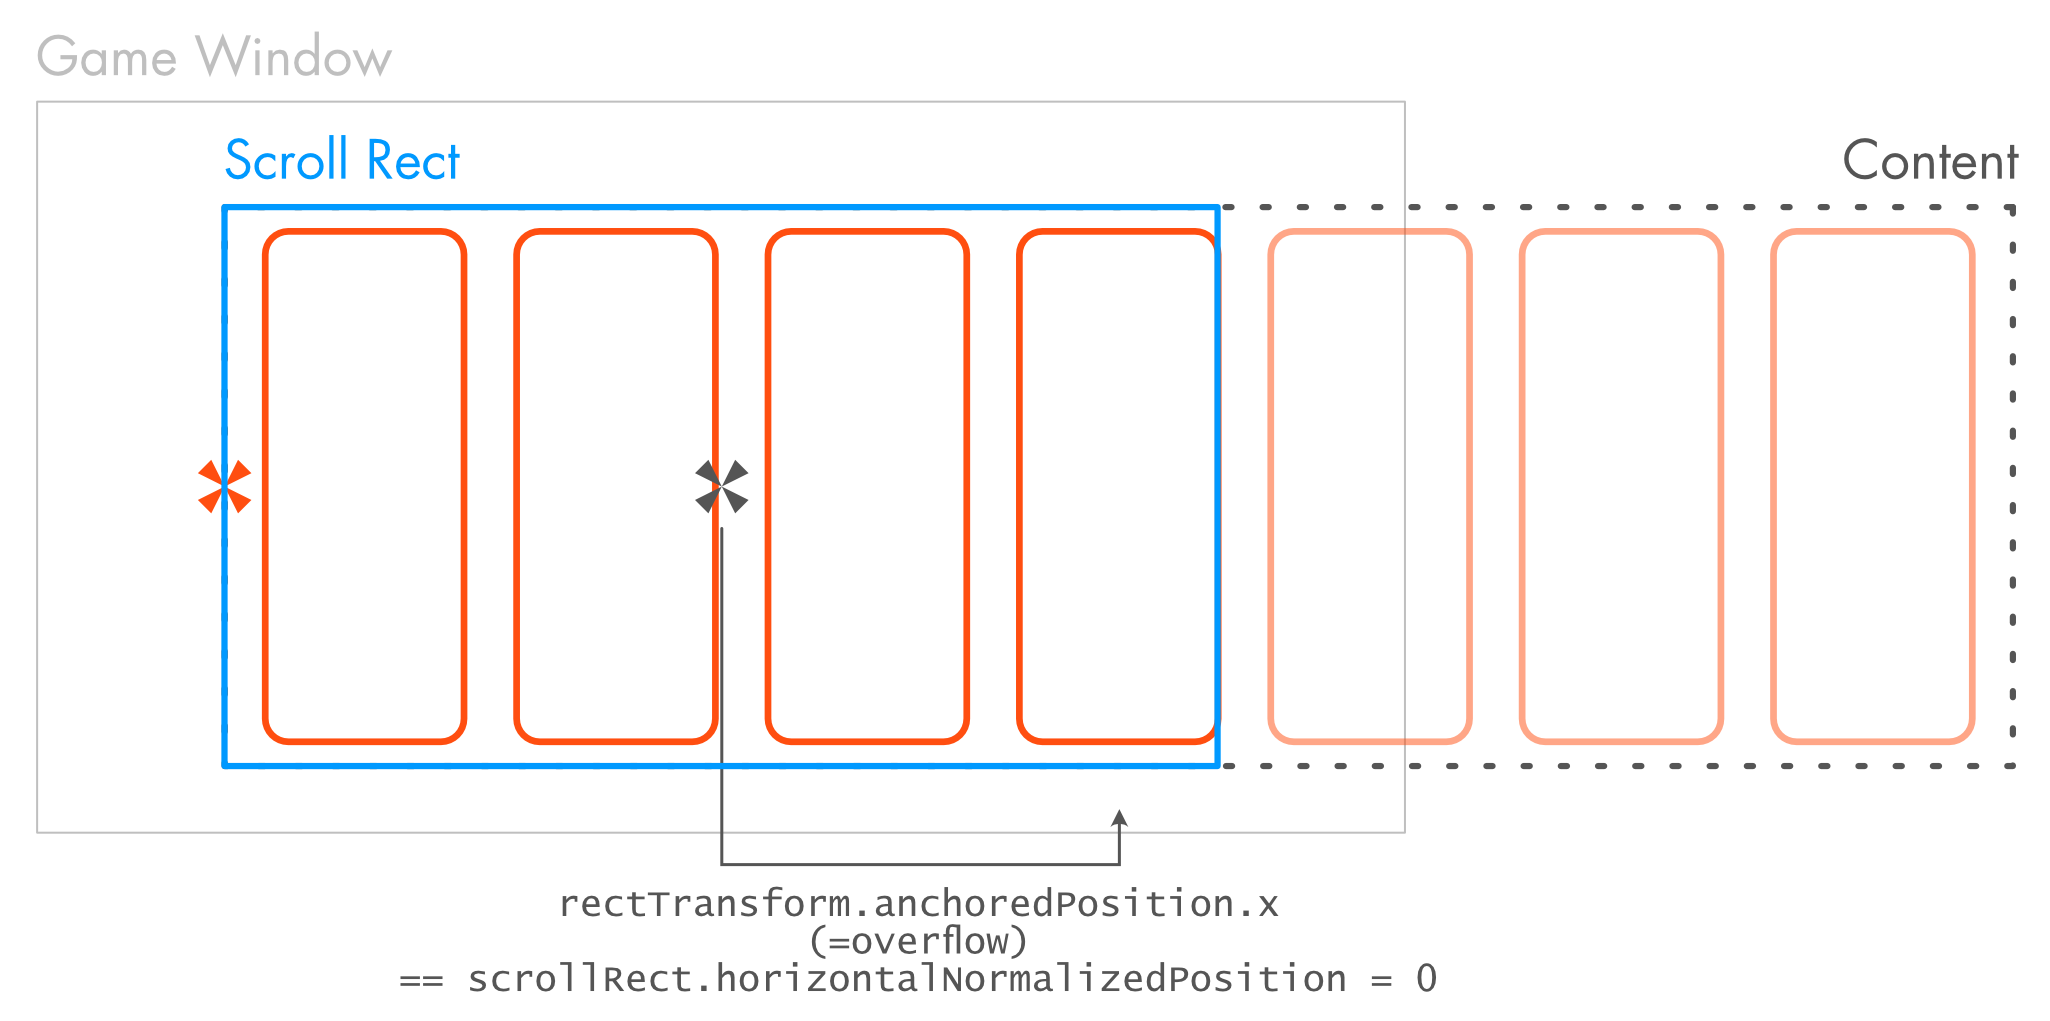
The value of the anchored position is here equal to overflow (positive), the anchored position is set to the right of the anchor to move the hole window right. overflow is a value I computed, which is half the difference between the content width, and the scroll rect width:
float overflow = (contentRect.width - scrollRect.width) / 2f
The value of overflow is the same left and right because we initially start with the content panel centered in the Scroll Rect.
To get the content to scroll to the other end, we simply set horizontalNormalizedPosition to 1, or anchoredPosition.x to -overflow:
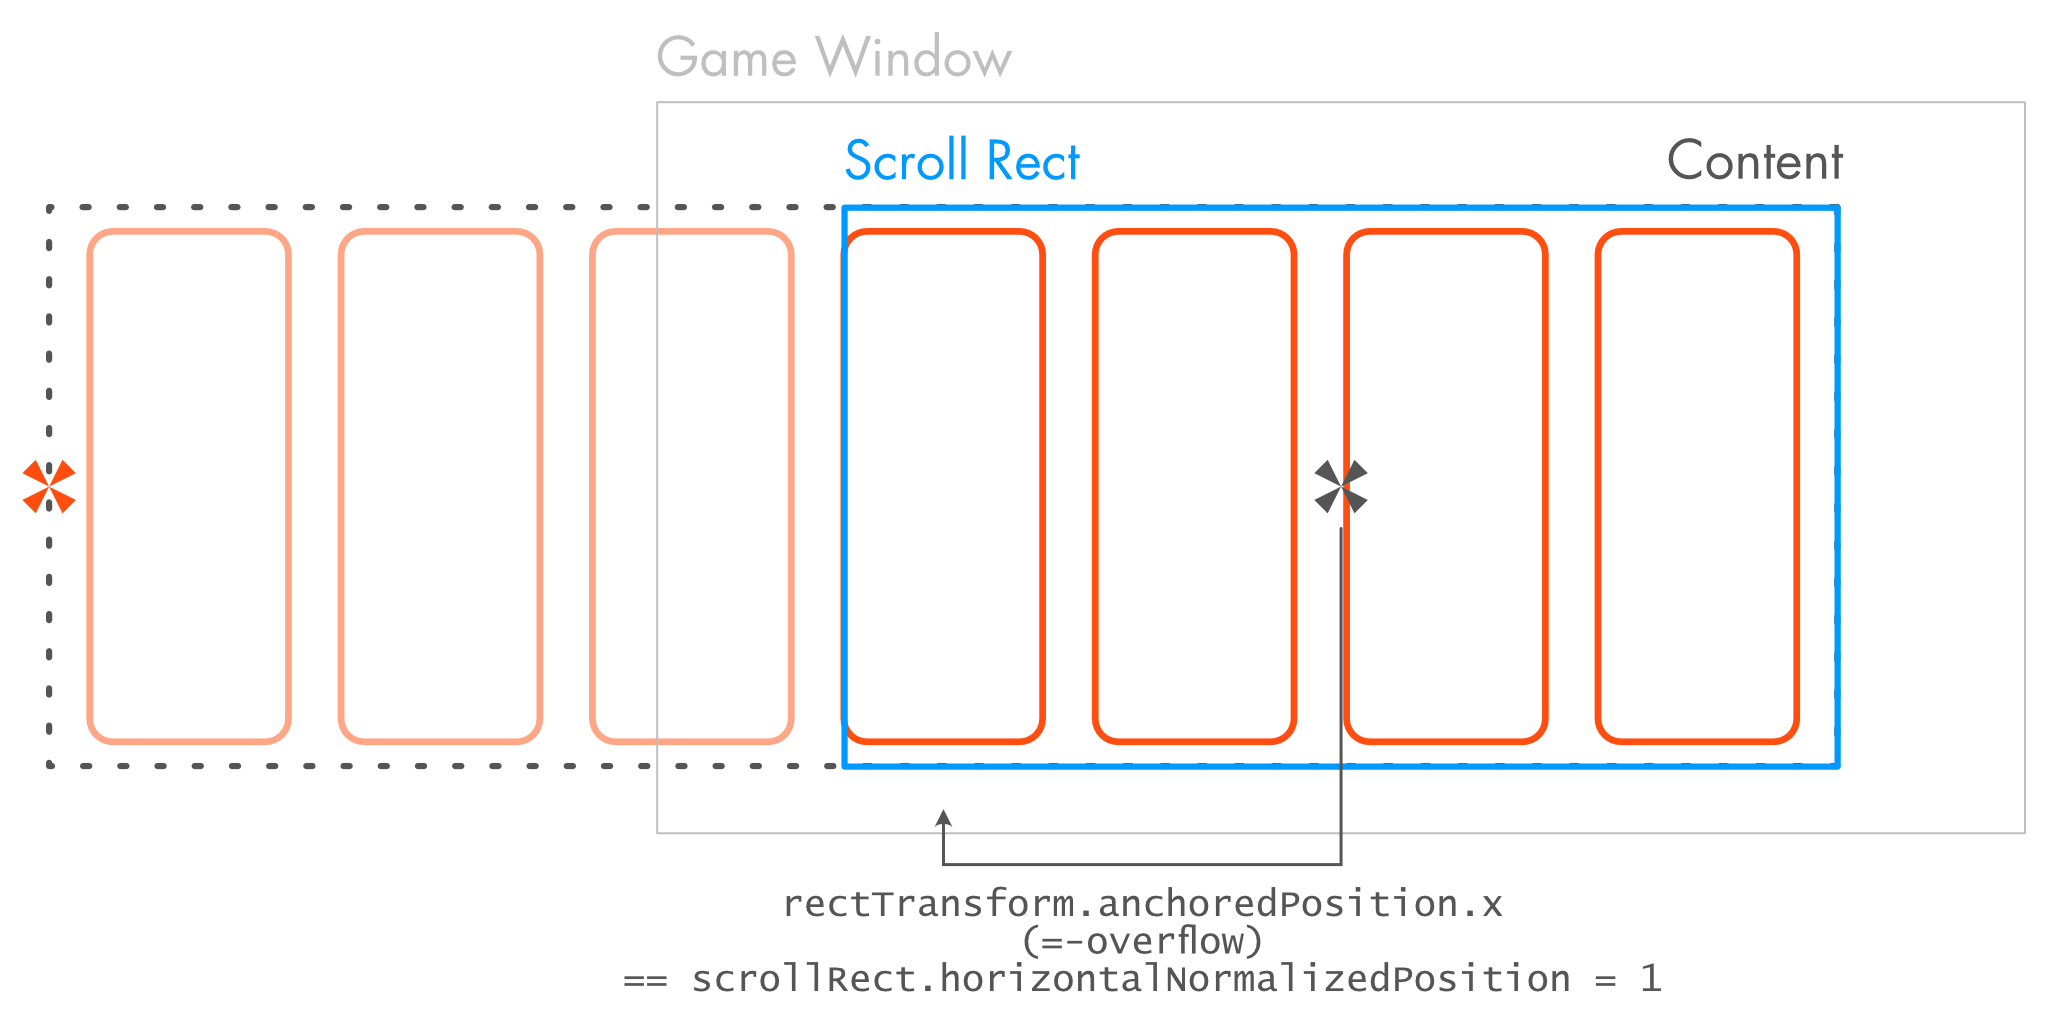
What we need to remember from this: the scroll rect moves from -overflow to overflow, and these are the values we will have to modify.
Now since we set each element’s anchor to the left side of our content rect, we can get the distance of the left and right boundary by calling rectTransform.offsetMin.x and rectTransform.offsetMax.x (see picture above).
We can then compute where the left border should be as follow:
float leftBorder = overflow - selectedRectTransform.offsetMin.x;
and the right side by adding the width of the content rect:
float rightBorder = contentWidth - overflow - selectedRectTransform.offsetMax.x;
We can then check if the anchored position is smaller / bigger than these values and update the position accordingly:
if (leftBorder > contentRect.anchoredPosition.x)
    contentRect.anchoredPosition = new Vector2(leftBorder, contentRect.anchoredPosition.y);
else if (rightBorder < contentRect.anchoredPosition.x)
    contentRect.anchoredPosition = new Vector2(rightBorder, contentRect.anchoredPosition.y);
And that’s it, the content rect is adjusted whenever an element outside the scroll rect is selected.
Thanks for reading, hope this can be useful to somebody 😄
Read the latest articles:
Updating the bug reporting tool
Early Coffee Games at GDC 2022 in San Francisco!
Hermit: an Underwater Tale is now on Steam!
